

Wiring a light switch may sound intimidating. But with a bit of guidance, you can handle it safely and confidently. Whether you’re renovating or replacing an old switch, learning the basics of electrical wiring for light switches is a great skill to have.
This beginner’s guide will walk you through the necessary tools, safety steps, and a straightforward wiring process. No complex jargon. No confusing instructions. Just clear steps you can follow at your own pace. Let’s get started!
Introduction to Light Switch Wiring
Light switches control the flow of electricity to a light fixture. Inside the wall, wires carry power from your home’s main electrical panel to the switch and then to the light. The most common light switch setup in homes is the single-pole switch. It’s simple and controls only one light from a single location.
Before you attempt electrical wiring for light switches, it’s essential to understand what’s behind the switch plate.
Why Learn Light Switch Wiring?
- Save money on basic repairs.
- Understand how your home electrical system works.
- Add new lighting features safely.
- Be more confident with DIY tasks.
Learning electrical wiring for light switches also gives you more control when troubleshooting problems.
Safety First: What You Must Know
Electricity is dangerous. Never take safety lightly.
Here are a few must-follow safety tips:
- Turn off the power at the circuit breaker before touching any wires.
- Test the wires with a voltage tester to ensure there is no current.
- Use insulated tools to protect yourself from accidental shocks.
- Wear rubber-soled shoes and work in dry conditions.
If you’re unsure, it’s always best to call a licensed electrician. But for small, straightforward jobs, you can usually do it yourself.
Tools and Materials You’ll Need
Before you begin, gather the following:
- Flathead and Phillips screwdrivers
- Wire strippers
- Voltage tester
- Needle-nose pliers
- Electrical tape
- New light switch
- Wall plate
- Wire nuts
Optional but helpful: a flashlight, label stickers, and a trim level.
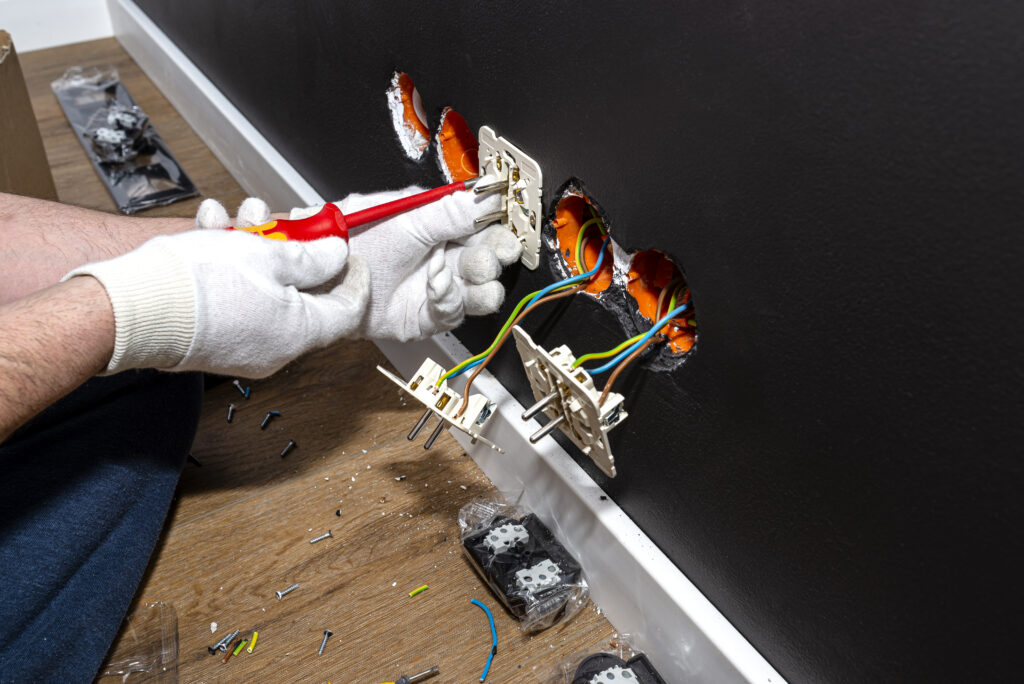
Understanding the Basic Wires
Let’s get familiar with the types of wires you’ll find:
- Hot (live) wire – usually black. It brings power from the panel.
- Neutral wire – usually white. Returns power to the panel.
- Ground wire – usually green or bare. Prevents electric shock.
In most cases of electrical wiring for light switches, you’ll be dealing with the hot and ground wires only. The neutral wire often bypasses the switch and connects directly to the light.
Step-by-Step Guide to Wiring a Single-Pole Light Switch
Follow these simple steps for success.
Step 1: Turn Off the Power
Go to your home’s electrical panel. Find the circuit breaker labelled for the room. Flip it to the “off” position.
Step 2: Remove the Old Switch
Use a screwdriver to remove the wall plate. Unscrew the switch from the electrical box. Gently pull it out to expose the wires.
Step 3: Test for Power
Use your voltage tester to make sure no power is running through the wires. This is the most critical safety step.
Step 4: Examine the Wiring
You’ll typically see two black wires (or one black and one red) attached to the switch. There may also be a bare copper wire connected to a green grounding screw.
Step 5: Disconnect the Wires
Carefully loosen the terminal screws. Remove the wires from the old switch. You may need to use needle-nose pliers to straighten the wire ends.
Step 6: Prepare the New Switch
Take your new single-pole switch. You’ll see two brass screws (for hot wires) and a green grounding screw.
Step 7: Connect the Wires
- Wrap the first hot wire around one brass screw and tighten.
- Wrap the second hot wire around the other brass screw.
- Attach the bare ground wire to the green screw.
Ensure all connections are secure and no copper is exposed.
Step 8: Tuck the Wires Back
Gently fold the wires back into the electrical box. Avoid sharp bends. Line up the switch with the box and screw it into place.
Step 9: Replace the Cover Plate
Screw the wall plate back over the switch. Make sure it sits evenly.
Step 10: Restore Power and Test
Return to your breaker panel and turn the circuit back on. Go back to the switch and test it. The light should turn on and off correctly.
Congratulations! You’ve completed the electrical wiring for light switches all by yourself.
Common Mistakes to Avoid
Here are a few things that can go wrong—and how to avoid them:
- Loose connections – Ensure wires are securely fastened under the screws.
- Wrong wire placement – Don’t mix up the hot and ground wires.
- Leaving bare wire exposed – Always tuck the excess wire back into the box.
- Forgetting to test voltage – Always double-check for safety before touching wires.
Wiring a Three-Way Switch (Bonus Section)
A three-way switch lets you control one light from two different locations—like at the top and bottom of a staircase.
This type of electrical wiring for light switches involves:
- Two switches
- A special three-wire cable (black, red, and white)
- A bit more complexity
We won’t cover it step-by-step here but know that it’s doable once you master the single-pole switch.
When to Call a Professional
DIY is great, but here’s when you should call an expert:
- If wires are damaged or burned
- If you see sparks or smell something odd
- If you feel overwhelmed or unsure
- If your home has aluminium wiring (needs special handling)
Even if you feel confident with electrical wiring for light switches, there’s no shame in asking for help.
Maintenance Tips
Once you’ve installed your switch:
- Check it every few months for signs of wear
- Replace a switch immediately if it feels warm or is buzzing.
- Don’t overload the circuit with too many lights.
- Keep the switch area dry and dust-free
Good maintenance helps your electrical wiring for light switches last longer and stay safe.
Conclusion
You’ve just learned how to safely and efficiently complete electrical wiring for light switches on your own. With the right tools and clear steps, anyone can do it. Doing small electrical jobs like this gives you confidence and can save money in the long run. Keep learning, stay curious, and never hesitate to call a pro if needed. Whether you’re fixing a flickering light or adding a switch to a new room, understanding electrical wiring for light switches opens the door to more DIY home improvements.
